This is an old revision of the document!
Table of Contents
Portal Server
The web portal at http://myakitio.com provides a free proxy service for your network drive. You can login through the web portal and access your device, no matter if you are at home, in the office or on-the-road.
The web portal at http://dyn.com provides a similar but paid service. This is provided by a 3rd party and requires that you have an active dyn.com account.
myakitio.com
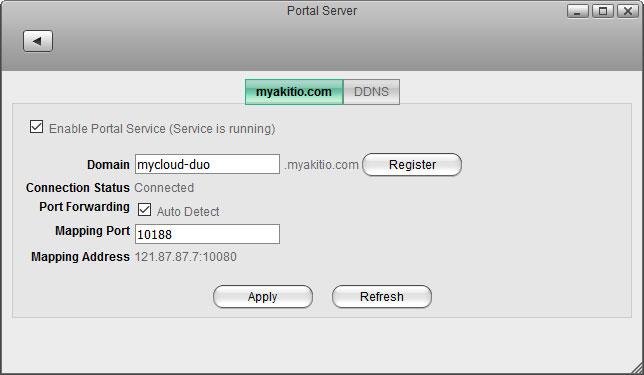
This service is provided for free to all Akitio users. The web portal allows you to easily login to your device, no matter if you are at home or want to connect to the device remotely. The default registration name is the MAC address of your network drive. You can also register your own name, to make it easier to remember. If your registration was successful, you can use either the MAC address or your registered name to login or enter the name directly into the URL field like this http://myname.myakitio.com.
If your network router supports UPnP port mapping and the UPnP service is enabled, set Port Forwarding to Auto Detect and it will automatically map the required ports to your network drive. If there is a conflict with the default port 10080, you can manually set another port and the information will be updated on the web portal as well. If automatic UPnP port mapping does not work as expected or your router does not support it, deselect Auto Detect and set up port forwarding on the router manually. Redirect incoming traffic on port 10080 to port 80 on your network drive.

| Field | Description |
|---|---|
| Domain | Enter a new name for your device and click Register to register a name that is easier to remember than the MAC address. All 26 English letters and dashes(-) are allowed but the name cannot begin with a dash(-). The name is not case sensitive. If the name is already taken, enter a new name and try to register it again. |
| Connection Status | Shows the current status of the network connection from the device to the web portal (e.g. Unconnected or Connected). |
| Port Forwarding | Enable Auto Detect if your network router supports UPnP, to automatically set up port mapping. Disable Auto Detect if UPnP is not supported or not compatible, in order to set up port forwarding manually. |
| Mapping Port | The port number that is used for port mapping. If you have connected more than one MyCloud to the same network, make sure to select a different port number for each unit. |
| Mapping Address | Shows the external IP address and port number that is used to access the device remotely. |
Network Setup
Recommended Setup
- On your network router, if supported, make sure the UPnP service is enabled.
- On your network drive, enable Auto Detect.
- In most cases, this is already the default setup and you can login without having to change anything.
Alternative Setup
- If UPnP is not supported on your network router or the recommended setup does not work, set up port forwarding manually.
- On your network router, if not needed, disable the UPnP service.
- On your network drive, disable Auto Detect.
- Note the port number under “Mapping Port” (e.g. 10080).
- On your network router, setup port forwarding to allow incoming traffic on port 10080 (see previous step) and redirect it to port 80 on your network drive. See http://portforward.com if you don't know how to set up your router.
Troubleshooting
- If automatic port mapping fails, set up port forwarding manually. Redirect incoming traffic on port 10080 to port 80 on your network drive.
- If remote login fails and port forwarding was not successful, on your router, add the IP address of your network drive to the DMZ zone.
- If there is a conflict with the default port 10080 or this port is blocked on the network you are trying to connect from, change it to another port number.
- If you see that after the login, the URL still shows the device name or MAC address instead of the internal or external IP address, apply the settings for the portal server once more. If necessary, change the port number for the mapping port to another number.
- If the “Connection Status” shows Unconnected, login to your network router and make sure that the TCP port 9000 is not blocked by the firewall.
dyn.com
Dynamic DNS is a paid service that provides the capability for networked devices using the Internet Protocol Suite to notify a Domain Name System (DNS) name server to change, in real time, the active DNS configuration of its configured hostname, IP address or other information.
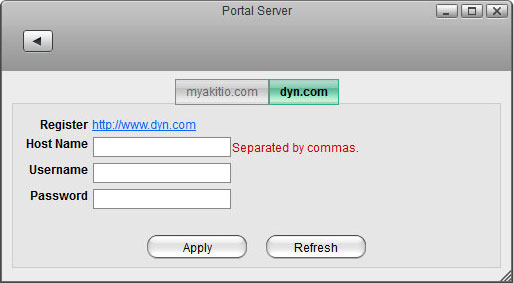
http://dyn.com can be used to register your device and then login remotely to your network drive via internet.

| Field | Description |
|---|---|
| Register | You can apply for a DDNS account at http://dyn.com. |
| Host Name | Enter the host name that you have set up at dyn.com. |
| Username/Password | Enter the username and password of your DDNS account. |
| Apply | Click Apply to save your settings. |
